Welcome to our guide to plastic laser engraving. In this guide, we will explore what plastic laser engraving involves, find out which plastics are suitable, follow our simple steps for engraving, and explore creative ideas for laser marking plastic.
Whether you're new to DIY or a seasoned craftsman, let's embark on this artistic adventure together. Are you ready? Let's dive in!
In this article:
- Part 1: Introduction of Plastic Laser Engraving and the Machine
- Part 2: What Kind of Plastic Can Be Lasered?
- Case Study: Laser Engrave Plastic Card in 5 Detailed Steps 🔨
- Creative Projects: 7 Recommended Plastic Laser Engraving Ideas for Beginners 💡
Part 1: Introduction of Plastic Laser Engraving and the Machine
1. Plastic Laser Engraving Explained:
"Can you engrave plastic with laser?" Absolutely! Plastic laser engraving is a versatile technique that involves using laser technology to create precise and detailed designs, patterns, or text on various types of plastic materials.
2. The Machine You Need:
To embark on plastic laser engraving, you'll need a laser engraving machine specifically designed to work with plastic materials. These machines typically feature adjustable settings for laser power, speed, and focus, allowing for precise control over the engraving process.
Part 2: What Kind of Plastic Can Be Lasered?
Various types of plastic can be laser engraved, but the suitability depends on the specific properties of each material. Some common plastics that are often laser engraved include:
- Acrylic (PMMA)
- Polyethylene (PE)
- Polypropylene (PP)
- Polycarbonate (PC)
- Polyvinyl Chloride (PVC)
- Polyethylene Terephthalate (PET)
- Delrin (Acetal)
- ABS (Acrylonitrile Butadiene Styrene)
- HDPE (High-Density Polyethylene)
- LDPE (Low-Density Polyethylene)
Each type of plastic has its own characteristics, such as transparency, color, hardness, and melting point, which can affect the laser engraving process.
However, colored plastic plates with smooth surfaces are generally an excellent choice for laser engraving due to their enhanced visibility and ease of engraving.
Besides, please remember that it's important to choose laser-safe plastic material to avoid any potential safety hazards.
Case Study: Laser Engrave Plastic Card within 5 Detailed Steps 🔨
Plastic laser engraving enables you to incorporate personalized and intricate designs onto your plastic items. Whether you desire patterns, phrases, or images, the process is straightforward. By following these 5 simple steps, you can achieve stunning laser engraved plastic cards.
Step 1: Choose Your Plastic
Plastic materials mentioned in Part 2 are all good choices for plastic laser engraving. In this guide, we'll be using colored plastic card for our laser engraving demonstration.
Step 2: Choose the Right Laser Engraving Machine for Plastic
Here, we recommend LaserPecker 4 (LP4)
*Alternative
If you want faster engraving speed and better effect on plastic items' surfaces, you can try a more powerful laser engraver like the LP5.
Step 3: Prepare Your Engraving Design
Use the LaserPecker Design Space app & software to create or import the image or pattern you want to engrave on the plastic card. Consider size, shape, and details like text or patterns.
If you lack inspiration or ideas for laser engraving on different materials, visit our CraftZone for a wealth of laser marking design ideas and inspiration.
Step 4: Set up the Plastic Laser Engraving Machine
Firstly, Make sure your engraver is powered on, and then connect your laser engraver to your computer or mobile device using the appropriate interface (USB, Bluetooth, etc.)
Secondly, Open the LDS and load your design.
Thirdly, Turn on the "Preview Mode" to confirm if the laser lens is correctly focused. To verify it, you have 2 methods.
If you choose LaserPecker 4 (LP4), the first method is to use a ruler to measure the distance between the plastic card surface and the machine, with a recommended distance of 15cm or 150mm.
Alternatively, you can achieve the correct focal length by judging whether the two red dots emitted by the machine overlap. This ensures precise focusing for optimal engraving results.
Fourthly, You need to place your plastic-made items within the designated working area and examine the design's appearance on the plastic card. If it doesn't fit correctly, you'll need to adjust its position and size to ensure it aligns with the dimensions of your project.
Finally, access the laser settings within the software and configure parameters such as power, speed, and resolution based on the characteristics of the plastic card you're using and the complexity of your design.
To get the best result, the recommended laserpecker 4 material settings for plastic items is 1 W 1064 nm; Resolution: 2k; Power: 100%; Depth: 13%; Pass: 1
To explore other recommended laserpecker engraving and cutting parameters, refer to the settings table that applies to any laserpecker machines, including LP1, LP2, LP3, LP4 and LP5.
Step 5: Start Your Plastic Engraving Now
Double-check everything to avoid mistakes. Then, hit the start button and watch the magic happen. The laser brings your design to life. Keep an eye on it, and you're all set!
When operating a laser engraving machine with a 450 nm blue laser, it's advisable to wear goggles or use a laser protection cover to protect your eyes and body from potential harm, as the blue laser can pose risks.
Additionally, please be mindful that smoke or toxic gases may be emitted during the plastic laser engraving process. Wearing a mask or employing an air purifier is essential for safety.
If you want to know more about how to use the LaserPecker LP4 machine, check out the LP4 User Manual on our website!
Creative Projects: 7 Recommended Plastic Laser Engraving Projects for Beginners 💡
From personalized plastic labels to laser engraved nameplates, let's explore the imaginative world where laser meets plastic, bringing your creations to life in a whole new way.
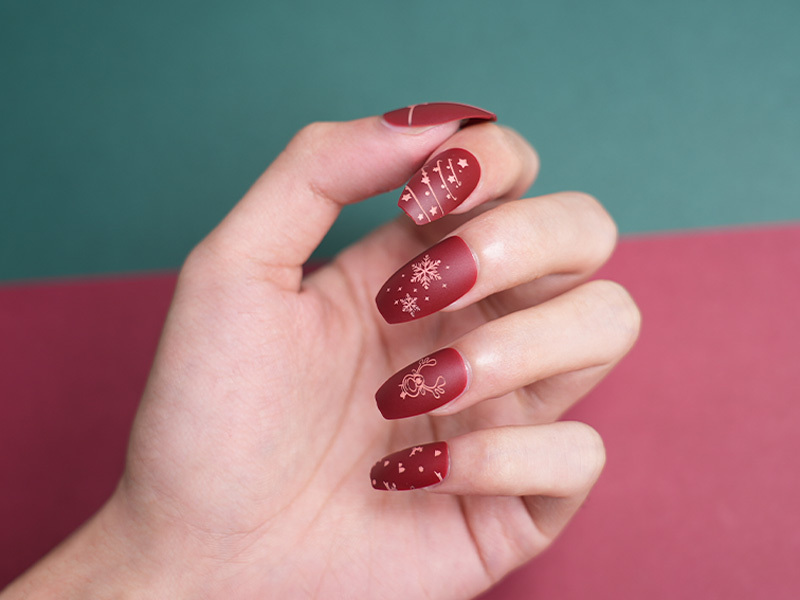
1. Nail Art
Craft custom nail art by laser engraving intricate designs onto the fake nail pieces.
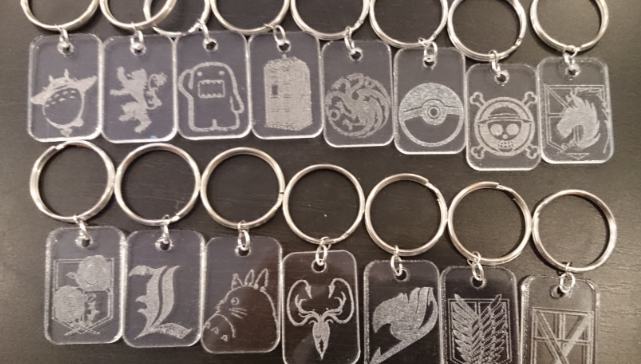
2. Personalized Keychains:
Craft unique keychains by laser engraving names, initials, or meaningful messages onto plastic keychain blanks. These custom keychains make thoughtful gifts or promotional items for events and businesses.
3. Laser Engraved Plastic Headphone
Add a unique touch to your headphones by engraving logos, names, or artistic designs. Personalization can enhance branding or simply make your headphones stand out.
4. Laser Engraved Plastic Bin
Engrave labels, symbols, or creative patterns on plastic bins for better organization or decorative purposes. This is ideal for homes, offices, or workshops.
5. Laser Engraved Plastic Airpods
Make your AirPods truly one-of-a-kind with custom engravings. Personalize them with initials, icons, or unique designs for a sleek and stylish look.
6. Laser Engraved Plastic Coffee Pods
Customize coffee pods with logos, text, or designs to add branding or a fun, creative twist to your coffee experience. Great for special events or marketing campaigns.
7. Laser Engraved Plastic Shampoo Bottle
Enhance your brand identity or create personalized gifts by engraving logos, product details, or decorative designs on plastic shampoo bottles.
Conclusion
In short, this guide introduces plastic laser engraving and its ability to transform personalized art. We hope it inspires you to explore plastic laser engraving, allowing your creativity to flourish and bring imaginative designs to life on plastic.